Monday, December 22, 2014

Magnetic Tin Advent Calendar


My niece Hadley is almost 3 and I started thinking, she's almost at the age when an advent calendar would be fun for her - probably next year she'll be more ready for it. So I looked around for one I could create and found my inspiration. 

The word 'Advent' has a Latin origin meaning 'the coming,' or more accurately, 'coming toward.' For Christian believers, Christmas is one of the greatest events in the yearly cycle, being the celebration of the greatest gift ever given by God to mankind. That gift was Jesus, the Son of God Himself, born into this world in human form and coming to live among us.

For this project you'll need:
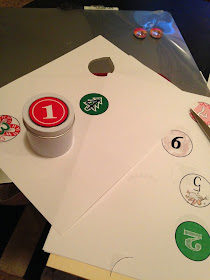
25 tins measuring 2 1/4 x 2 1/4 that have a clear window in the lid and a magnetic back, found at Michaels in the dollar bins
a magnetic dry erase board square 14x14 is the size I used (found at Walmart)
labels for the tins 1-25 - I designed mine in Word and used a red and green theme, I printed on copy paper and cut out, so they'd fit into the clear insert in the tins. You could also use scrapbook paper and stickers or sticky labels.

To design in Word, I chose Insert/Shapes/Circle.  Then under Drawing Tools, I sized the shape to 1.69 x 1.69. I chose a black outline and different fills.  Then I inserted a text box over that shape and added each number in a unique font.


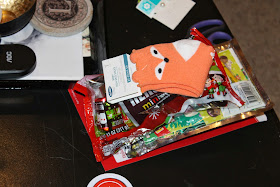
For this year, I put little gifts in each tin for Hadley to find and it was really fun shopping for creative, little items.  Here are some ideas:

-socks  -lip gloss  -fingernail polish  -stickers  -dice  -little toys  -rings  -bracelets  -necklaces  -hair bands  -Christmas ornaments  -candy  -candy necklace  -ring pop  -money  -bottle brush trees  -figurines  -little stuffed animals  -bath novelties (fizzies that color the water or pills that expand into sponges)


In future years, as Hadley gets older, my sister's family can try new ways to celebrate advent.  Here are some ideas:

-each day could contain a piece of paper with a Christmas activity to do as a family (sing carols, look at lights, watch Rudolph, wrap a present, bake cookies, visit Santa, etc.)

-get your child a mini tree for her/his room and each day could contain a mini ornament to add to his/her tree

-a clue to find pieces of a nativity hidden around the house

-the title of a different Christmas book or poem to read each day

-the title of a Christmas carol to sing each day

-Bible verses to look up that collectively tell the story of Jesus birth

-the name of a family member that you find a way to encourage that day

-different amounts of money, with the instructions to find a creative way to give that money away that day
 
-a Christmas photo scavenger hunt - a different Christmas item to find and photograph each day

-an instruction for an artistic expression of Christmas for each day (draw an angel, use watercolors to paint a house lighted with Christmas lights, write a story about a girl who wakes up on Dec. 1 in Santa's Workshop, use pastel chalk to create a winter landscape)


Merry Christmas!

Monday, December 15, 2014

Christmas Mantel


chalkboard christmas, LyndisProjects
This was SO.MUCH.FUN!!  This process really is one of my favorite things to do.  Think, plan, look at Pinterest, soak in inspiration from stores and nature and catalogs, then come up with a concept,  SHOP and get everything home and experiment with what looks good.  SO FUN. 


And I love when it is complete and I'm so happy with how it turned out.

I knew my overall theme was chalkboard/red/antique.  I knew I wanted a giant chalkboard and a boxwood wreath. 

Giant Chalkboard:
I measured the wall above my mantel and went to Lowe's and asked them to cut a thin board to my dimensions.  Unfortunately, I did not get the amazingly-helpful-level of customer service that I usually get there, but nevertheless, I loaded this giant piece of wood in my car and got it home. 

Then I started chalkboard painting.  I bought a spray chalkboard paint at Lowe's and used the entire can and the coverage was terrible.  So then I bought a can at Wal-mart and rolled it on, which worked well.  When using chalkboard paint, several thin coats is best. 


Then I took all my Regular Decorations down.  So the pic below looks really sad.
And put the chalkboard up - just to make sure it fit!

Then I took sidewalk chalk and seasoned the entire board with chalk.  This is so that the first thing you write won't be "burned into the board".   Then you brush it off with a soft cloth.

This is how it looked up - with no decorations. 

 Boxwood Wreath:
These projects were running concurrently and the wreath project began in October.  I found this hideously decorated wreath at Goodwill.  I took all the embellishments off and left it waiting for me to make it a beautiful boxwood wreath.

We have boxwood bushes in our front yard, so I grabbed a bucket and some floral cutters and went to work.  I had to refill the bucket about two more times!


I didn't know if I'd need to wire branches together or wire them to the wreath form, but I didn't, I just stuck the boxwood branches in the grapevine.
It was fun seeing it take shape.


And very exciting to see it up on my chalkboard - it adds so much!!
I will note, I didn't do anything to preserve my branches and I didn't water them at all, since it is up against a chalkboard.  I read a blog that said they made a wreath like this and the boxwood still looked good after two months (although I think they regularly misted their wreath).  I made this at the beginning of November and probably...after three weeks, it started looking dried out.  Even dried out, it still looked good, just like dried leaves, rather than glossy ones.
 And then I added "joy" in the center of the wreath.


From there, I had three different ideas for the rest of the mantle.  I used things I had laying around and experimented. 

-empty frames
-lots of white candles, varying heights, in mixed metal vintage holders
-tin containers holding greenery 


Surprisingly, Goodwill was the deciding vote.  The frame selection wasn't great and the ones that worked were $40 each.  No good.  And the candle holders were...gaudy.  But they had two different tin containers, which were around $1 and I thought when grouped with others, would look excellent!

 My local antique store was just as accommodating - in the first booth, there was a a tin pitcher, with fading red (so full of character) and an ADORABLE tin flour sifter with a little Christmas-green handle. 


Finally, my good friend Hobby Lobby had many choices at 50% off and I chose this one.  HL also had the perfect pine branch greenery that I needed.


The mantel is the focal point of the room and ties all my other décor together!

Monday, December 8, 2014

3 Different DIY Christmas Ornaments

1. Photo Cube Ornaments
 
I found this blank, cardboard, block ornament at Hobby Lobby and bought it to see what creative idea I could come up with to decorate it.  I decided on making it a photo cube of my niece and nephew and giving it to my mom. 
 
Step 1: I chose the photos and sized them to the cube, as well as de-saturated them.
 
Step 2: Cut out the photos.
 
Step 3: I painted the cube burgundy, to match my mom's tree theme this year.
 
Step 4: I used mod podge to paste the pictures onto the cube.


2. Chalkboard Ornaments - Chalkboard is part of my Christmas theme this year, so I decided to make some chalkboard ornaments.  I bought a pack of blank wooden circles from Michaels.  I spray-painted them with chalkboard paint and I designed some chalkboard looks in Word, mostly using Christmas song lyrics.  Then I printed and cut them out and laid them over the painted wooden circles. 
 
Then I traced over the design with a pen.  This is how it looked.
 
 
Then I went over the design with a chalk marker.  Some turned out good, some are a little messy, but overall - they covey the "chalkboard look" I was going for! 


3. Burlap Stamped Ornaments
 
 
I found these little burlap bags in the dollar bins at Michaels (2 bags for $1).  I really liked them and felt like they went along with my Christmas theme this year.  So I bought them without a clear idea of what I'd be doing with them.

I used the same round wooden craft circles that I used for the chalkboard ornaments.

Once I got home, I decided to cut up the burlap sacks and glue them onto the wooden circles to make ornaments.  I used hot glue to glue the back down and then added a ribbon to make them into ornaments.  Voila! 

This post is not so much a tutorial about how to make these ornaments, but more a reminder to keep your eyes open to elements that can be re-worked into what you need.  Especially things found on sale, in the dollar bins or at a thrift store. 


Which DIY ornament is your favorite?