Monday, January 26, 2015

Goodwill Cork Board Gets a New Look

I found this cork board at Goodwill for $2.99 and decided it could be cute, but it needed a makeover!  It turned out to be a great deal, because one just like it at Office Depot is $24.99.  I took it home, cleaned it, and taped the edges, for painting.  Then I added a few coats of my favorite turquoise-y paint by Martha Stewart.
 
 
I also had to add mounting brackets on the back. 
And now it's so much cuter!
 
 
And it looks great hanging in my office at work!


Monday, January 19, 2015

Minnie Mouse Birthday Centerpiece


My sister kept my niece Hadley's birthday simple this year - just immediate family, at McDonalds, with a cake.  But she knows I like projects and so she let me create a centerpiece for the party.  She was going with a Minnie Mouse theme, so that's where I started. 


I browsed Pinterest and online for ideas.  I love the process of absorbing inspiration and then creating something.  Love it! 

After browsing - here is my concept and list of things to do and get (for your amusement!). The general idea (as drawn below) was to get a little pink bucket, some white dot stickers, either cute straws or painted skewers, crinkle filler and Instagram pictures of Hadley, along with one of the free printables I found online in the center.  I ordered the Instagram pics from Walgreens - which is so great - you can upload them directly from Instagram and then pick them up later that day and they're cute square prints.


Here's the before pic of the pink bucket and white stickers!


After!  So cute and very Minnie!

 
As everyone who has done a project knows, sometimes things don't come together exactly as you'd envisioned.  I realized I was thinking the pictures would be 2x2 inches, but were actually 4x4 inches and way too big to put several in the bucket, so I kept the Minnie Mini Topiaries simple.  The white dot stickers worked perfect - to mimic Minnie's dress.  Then I had some Styrofoam balls in my craft supplies, so I cut 1/3 off, to give it a flat edge and used double stick tape to tape it down to the bottom.  Then I stuck the cute pink straws in.  Then I used double stick tape to tape the 4 printables together and to the straw.  Then I filled the bucket with crinkle filler. 

Minnie Mouse topiary

Then, I had all these adorable Instagram photos of the beautiful birthday girl, so I decided to make table tents to display them.  This turned out really easy and perfect for our event. I just cut 12x12 scrap book paper into strips of 4.5x12.  Then folded them in half, then I folded about 1.75 inches of the bottom inward.  I used double stick tape to add the photos on both sides. It was great that they could fold flat to travel and they stood up really well on the table once there.


photo table tents, Minnie Mouse topiary


It was a lovely celebration of a very special little girl.  Happy Birthday Hadley!!!

Monday, January 12, 2015

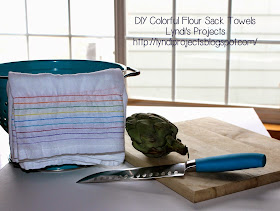
Flour Sack Dish Towels

how to sew flour sack towels, colorful kitchen decor, rainbow

I've always liked flour sack towels for the kitchen because they're thin and dry quickly and they're lint free.  My sister got some as a gift for Christmas and that started me thinking I'd like some too.  So then I looked on Pinterest to see if there were any cool, crafty ways to personalize them.  I found and LOVED this project by A PRETTY COOL LIFE.  So I decided to make some of my own.  I wanted a rainbow look, but I also wanted to make sure to include turquoise, since that is the main color of my kitchen.  And after it was too late, I realized I got yellow and green mixed up (according to rainbow order...) and I added a fuchsia in a weird place, and the green looks more forest-y than Kelly...but overall I'm happy with the result!

For this project you'll need:
flour sack towels (these were $4.88 for a pack of 5 at Wal-Mart)
thread in rainbow colors
sewing machine
patience
time


One thing I liked about this project is that it helped me learn something new about my sewing machine.  According to the tutorial, I should use triple stitch, to make the colors show up better.  According to my manual, triple stitch is available on my machine and the setting for it looks like three blue lines.  It took me awhile, but I then figured out I had to turn my dial to S1 to get that setting. 


I used the hem of the towel as a guide for my first stitch and then just lined the edge of the presser foot up with the row of stitches below it.  I usually have trouble sewing straight lines, but this method seemed to work for this project.


I made three towels, and did each color on all three, before moving on to the next color and it was SO MUCH WORK and TOOK FOREVER!  For one thing, winding a new bobbin and changing out the color of thread every few minutes is a lot of work.  For another thing, when the machine does triple stitch, it goes back over every stitch, so it takes longer than usual.  I timed one color on one towel and it took 2:37 just to stitch that line.  So that is an hour and eight minutes of just stitching.  Then add in time for winding the bobbin 9 times and changing the thread 9 times, and breaks for drinking diet coke and it takes a full afternoon to finish this project.  But the end result is beautiful, useful, custom and gives you a sense of accomplishment! 


Monday, January 5, 2015

Elegant Black Tulle Wreath

1. For full instructions on how to make a tulle wreath, see this previous blog post.
2. Apparently I didn't take a well-styled final picture. :(
 
 
I started with a large wire wreath form and wrapped it in black satin ribbon.
 
 
Then I cut lengths of black tulle and black glitter tulle by wrapping it around a book that I deemed the correct size and cutting both ends.
 
 
Then while watching a movie, I tied them on, alternating the regular and glitter tulle and pushing the tied pieces together occasionally.
 
 
Then I added embellishments.  I added a black feathered hair clip.  Then I hot glued on a the big round sparkly piece, which I found at Hobby Lobby.  Then I went shopping at an antique store to find the smaller brooch and pinned it on.  I experimented with adding peacock colored feathers, but decided to keep it simple, elegant black and bling.


Then at Christmas, the wreath went to a home with my sister Jordan!