I wish you a Merry Christmas - I hope your holiday is filled with the joy that comes from remembering the true meaning of Christmas and the blessings of love, joy, hope and peace.
Monday, December 25, 2017
Monday, December 11, 2017
2017 Christmas Tree
Usually, I'm thinking a year ahead about my next year's Christmas tree and overall Christmas theme, but this year I was 100% focused on buying my first house. I bought my house in August and painted the kitchen cabinets and slowly got a few things on the walls. I bought new living room furniture and a dining table and created a craft room from the ground up. And unpacked. And mowed the lawn. And planted flowers in the window boxes.
All that to say, this year was unusual and by November, I did not have a plan for my Christmas decor. I planned to use things I already had, but I didn't have a vision.
Then I came across this ribbon from Hearth and Hand by Magnolia at Target and it became the centerpiece of my vision along with the song/sentiment "There's No Place Like Home for the Holidays" - to celebrate my first year in my new home.
I pulled from last year when my theme was O Holy Night and the tree was decorated in stars and the year I had a red/chalkboard theme.
My first purchase for this year's Christmas decor was this galvanized steel tub from Ace Hardware.
Then I bought my beautiful Fraser Fir tree from Lowe's and once again had a great customer service experience there. And even with no lights or adornment I love it in the tub in my living room.
Another benefit when you get your tree from Lowe's is that they usually have a bin of branches they've cut for customers and they let me take as many branches from that bin as I wanted. I used those extra branches all over my house in buckets and on my dining room chandelier - which has been one of my favorite things this year.
Then, although I had a BUNCH of strands of clear lights, a lot of them didn't work, so I got my tree partially lighted and had to buy more.
Next I added strands of beads and my beautiful white and black plaid ribbon.
Then I used my homemade chalkboard ornaments from a previous year, but I modified them to fit this year.
Then I filled in with a few new ornaments from Target, some stars from prior years and some black shiny globe ornaments from Michael's.
I posted this bell ornament pic on Instagram and the next morning I woke up to a message from Target asking if they could use my photo - that was pretty exciting! They used it on their #TargetStyle section of their website!!
I'm so happy with it!
And every night when I turn off all the lights - the magical glow of the tree makes me so happy! (And makes me want to take more pictures!)
Monday, December 4, 2017
101 Stocking Stuffer Ideas
1. Kleenex Go Packs
2. Hand sanitizer
3. Post it notes
4. Tide-To-Go Pens
5. Tickets to an upcoming event
6. Socks
7. An ornament
8. Pens
9. Markers
10. Colored Pencils
11. Nuts
12. Restaurant Gift Cards
13. Nail clippers
14. Bookmarks
15. Bar Soap
16. Ear buds
17. Hair products
18. Batteries
19. Mini flashlight
20. Chapstick
21. Eyeglass kit
22. Fun Band Aids
23. Contact case
24. Screen wipes
25. Magazine subscription
26. Gloves
27. Candy canes
28. Scissors
29. Glue
30. Mini stapler/staples
31. Bubble bath
32. Paint/paintbrushes
33. Fun Dip
34. Ring Pops
35. Candy Bars
36. Gum
37. Amazon Echo Dot
38. Quarters
39. Chocolate Gold Coins
40. Magnets
41. Sunglasses
42. Scarves
43. Ice Scraper
44. Deck of Cards
45. Uno (small game)
46. Christmas novelties
47. Car air freshener
48. Movie Theater gift certificates
49. Selfie stick
50. Fruit snacks
51. Perfume or cologne
52. Amazon prime membership
53.
54. Hats
55. App Store Gift Cards
56. Screwdriver
57. Drill bits
58. Grilling Seasoning
59. Shot glasses
60. Keychains
For Kids
61. Crayons
62. Playdough
63. Temporary tattoos
64. Stickers
65. Blind bags
66. Finger puppets
67. Stuffed animal
68. Bath crayons
69. Glow sticks
70. Cars
71. Bouncy balls
72. Bubbles
73. Finger cymbals
74. Maracas
75. Slime
76. Straws
77. Perler Bead kit
78. Hatchimals
79. Color Bath Drops
For Women
80. Earrings
81. Thank you Notes
82. Nail Polish
83. Nail files
84. Small makeup bag/pencil case
85. Hair bands
86. Mini candles
87. Cake decorating tips/bags
88. Lipstick
89. Eye Shadow
90. Fingernail file
91. Sewing kit
92. Extracts
93.
94.
95. Measuring spoons
96. Dish towels
97. Seed Packets
98. Rings
99. Sprinkles
100. Cosmetic Applicator Sponges
101. Kitchen Utensils
Monday, October 23, 2017
Craft Room Creation
For the first time ever - I own a house and I can do anything I want - I can paint, I can install shelves - I can even install a pegboard! The pic below shows my basement, which was my blank canvas for my craft room.
Here's where I'm at right now - it took a lot of work to get to this point! And I have a feeling this space will evolve a bit more before I feel like it's "done". But for now - I'm loving it! I'll take you through the steps of how I got to this point.
First, I got the two end cabinets from Habitat for Humanity ReStore - which was great - they're really well priced and my purchase helps their organization. And they're really nice quality cabinets - they have soft close drawers and the one that's closed has pullout shelves.
Then I obsessively searched for a "countertop" that would be the exact right length between those two walls. After considering all options, I found a "prefinished shelf" at Menards (I think this is what I ended up with). Once I got it home and placed on top of my two cabinets, I realized it was long/heavy enough that it needed a center support. The cabinet in this pic, topped with books was a temporary solution.
Then I started installing shelves. Then I uninstalled them after realizing I needed wall anchors to support the weight and then I reinstalled them.
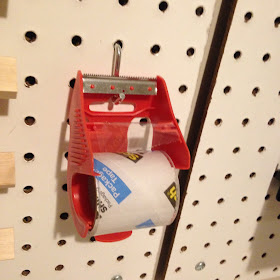
Then I installed the two pegboards. When you buy a pegboard, you also need a "pegboard mounting kit" because when you think about it - the pegboard can't be right up against the wall, you need some space, so the peg hooks will fit in.
I bought a thread rack like this:
And it was SO FUN to put it on my pegboard and put my thread up there.
Everything I added to the pegboard was really fun - I definitely recommend getting one! Also I paid $6.99 for each one and it has a huge visual impact.
I searched online for a any type of cabinet that had the same height as my two end cabinets and found only a few and they were all at least $200.00, so I went back to ReStore a few more times and found one for the center. It's not exact, but pretty close.
Then I bought (expensive) "one step" chalk paint, because that sounded easier than sanding, priming and painting. I hadn't used chalk paint before but I understood the concept.
The first coat on the first cabinet...I was not happy. Terrible brush strokes and terrible coverage.
But I kept going.
After two coats and a round of touch-ups I'm finally ok with the paint coverage and it was nice not to worry about sanding or priming. At this point I was able to hook up my computer and sewing machine and start unpacking boxes. I wanted a bunch of unique storage containers on the shelves, so I got something from Menards (wire basket holding yarn), Homegoods (gray wicker basket holding ribbon), Target (gray plastic basket holding punches), Michaels (wooden pen organizer below pegboard AND I already had the black photo boxes) and Joanns (cute tool box holding spraypaint). I also got the little wire baskets holding paint on the pegboard from Hobby Lobby and I love them so much - they're on sale this week and they're only $2.50. #ItsTheLittleThings
Like I said - I'm VERY happy to be at this point and I think it's still a work in progress.
I think it'd be fun to store something in an oversized mason jar.
And I'm trying to figure out lighting.
What do you think?
Monday, October 2, 2017
The Iron Giant Costume
A couple months back, my adorable nephew Henry
woke up one morning wishing he could dress as his favorite character - The Iron Giant
which apparently is a film from 1999 that is available on Netflix
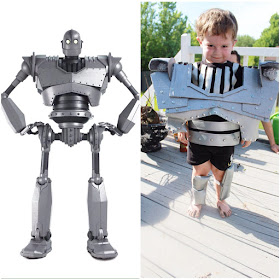
Since it's a movie from the 90s - there aren't a lot of costume options out there, so I decided to construct one from scratch!
I looked at a pic online, drew out a sketch and went shopping for supplies.
I cut up and sewed a metallic table runner onto a black T-shirt.
Then I freehand drew the shape of the shoulder piece, and cut out strips of cardboard where I needed dimension. I used hot glue to add all the strips.
Then I spray painted the shoulder piece with a hammered metallic spray paint.
I cut this piece out of the metallic fabric and added rivets.
I added a bunch of rivets and screws to give it a realistic robot look.
I sewed arm and leg pieces, stuffed like pillows. with Velcro straps.
I decided to attempt a helmet.
I used a balloon and a piece of poster board as the base for paper mâché.
I was pretty happy with how it turned out
And it was ADORABLE to see Henry giving me his best Iron Giant stare!
The mask wasn't that comfortable/wearable, but pretty cute on Henry.
♥♥♥
This was a really fun project for me. Problem-solving is one of my favorite things and I loved starting from a picture - with no instructions or blog posts and figuring out how I could replicate it. With Halloween coming up - you might have an opportunity to do the same thing!


