Monday, May 27, 2013

Easy Felt Envelope Pouch

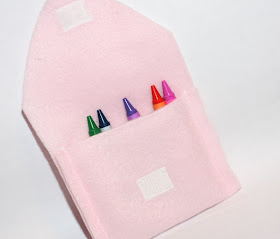
felt envelope for kids at a wedding


My sister Laura's wedding is coming up in a few weeks.  I am in charge of the kids activity books for the reception (which I will share about in a later post - here).  After I finished the books - I needed crayons!  The smallest packs of crayons in stores were 8 packs which were .99¢.  I needed approximately 24 packs = $24.00.  PLUS, the kids would only get red, green, blue, etc.  So I decided to buy a big pack of crayons and divide them into bags.  My first thought was Ziploc snack bags  - but that isn't me!  Creative details are my favorite thing - so I started searching online for easy, small pouches to make.  I stumbled across the idea of an "envelope pouch" AND the idea of using felt, which doesn't fray and is inexpensive.  PERFECT!!  So instead of $24.00, the total cost of my project is about $17.00 and much cuter!!
 
You need:
   felt - I was able to make two pouches out of one piece of felt
   sewing supplies
   Velcro (you could, of course, use buttons or snaps, but since this project is for kids, I chose Velcro)
    buttons (for decorative purposes only)

I folded the felt lengthwise and cut it in half.  Then I positioned the crayons where I wanted them.


Then I folded in half lengthwise again and cut one of the corners.  The felt I got is really thick and hard to cut through a double layer.  I tried rounded edges and straight - both look good. 
The dimensions ended up at about 4.5 inches wide and 10 inches tall (at the highest point).


I discovered it is SO much easier to sew the Velcro on before sewing up the edges


Then sew the two sides (I used my sewing machine, but hand sewing would be fine too) and sew the Velcro onto the flap.  I don't know if it matters, but I put the fuzzy part of the Velcro on the envelope flap and the hard loop side on the envelope. 


Then I hand sewed a pretty button onto the flap.


Like most of my projects, they aren't perfect,  but I love them! 


And I think the pretty felt pouches will be a big improvement on the box!  What do you think?


Monday, May 20, 2013

Zippered Make-Up Bags

This project included many "firsts" for me - first time using piping, first time with a zipper, first pleat, first project including lining.  So there was a huge learning curve.  I looked at a bunch of instructions online and found a very cute pleated make up bag at Charm Stitch.  I liked the size and the pleat and the overall look of these bags.  I made several, trying to improve my sewing skills and I think they are getting better!  I won't try to do any explanations, as I'm still learning myself, but hopefully this will inspire you to try something in the sewing world you haven't tried yet!!

First Attempt - some unpolished details. 


Second Attempt - This one actually turned out pretty well and is my new makeup bag!


Third Attempt - I tried a plain rectangle bag, turned out well.  It was the most popular, when I showed my mom and sisters.
 
Fourth Attempt - Still not perfect, so I keep trying!


Share what you've been attempting - even if it's not perfect yet!


Monday, May 13, 2013

EASY Toddler Dress

I wanted to make my niece, Hadley, a simple, soft, comfy, everyday dress, so I bought a plain white tank top (size 24 months) and 1/4 yard of soft, knit, turquoise fabric. 
 
Tank - $2.44 from Wal-Mart
1/4 yard knit fabric - $1.12 from JoAnn's Fabric
Total Cost - UNDER $4 - amazing!
 
The first step was to wash both the tank and fabric (I think the reason is, if they are going to shrink, you want them to shrink before you sew them.)
 
The width was perfect at 1/4 yard and for the length, measure around the entire bottom of the tank, then double that. 

Fold the width in half, then fold the length in half and sew the two short ends together, making a circle.


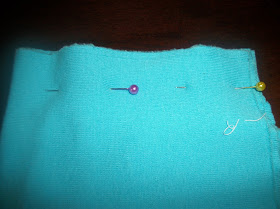
Then stitch along the top edge, using your widest stitch setting, leaving long strings.  Pull the bottom string to ruffle the fabric. 
 
 
Then pin and sew the ruffled edge to the bottom of the tank. 
 
 
You can flip it over and either leave it or add a top stitch along the seam.  The dress is almost perfect, but still needed something. 
 
 
Out of the leftover knit fabric, I made a rosette to add.  Cut 5 big circles (about 2 1/4 inches in diameter) and 8 small circles (about 1 1/2 inches in diameter).  Use one big circle as the base.  Take a big circle and fold in half, then fold in half again.  You have a little pie-shape.  Sew (I used a needle and thread and sewed by hand) that to your base circle and do the same with 3 more big circles.  Sew those down to the base, near the center.  Then do the same process with the small circles.  I sewed mine to the tank, but you could also hot glue to a pin and pin it on.


It looked so cute on her and she is the cutest model in the world!!


Monday, May 6, 2013

11x14 Photo Collage for Under $5


I love taking pictures and I've always documented the world around me.  When I finally got a smart phone and Instagram, I started taking even more everyday pictures. 
 
I'm wearing new slippers from Target - picture. 
 
I am walking into the movie theater - picture.

 
I'm playing Scrabble - picture.

 
My adorable niece is wearing the Santa pjs I gave her and trying to brush her own hair...picture!

 
  You get the idea.
 
   I wanted to find a way to display these photos - they all remind me of life,
my favorite things and memories. 
 
I got really excited when I discovered Prinstagram (a company that prints your Instagram pics). 
They will print a poster collage or will print little squares, which are adorable. 
 
But, their poster collages are expensive.  Shipping is expensive.  I saw blogs about taping the little square pictures together in order to make a collage and knew I would struggle with that
(I have trouble with straight lines).
 
So I came up with my own alternative.  I used Picasa (which is a great, free software to have)
and created my own collage.
 
After experimenting, I ended up using the dimensions 20x16 and 30 pictures.  I adjusted the grid spacing until it looked right to me.  I saved that collage as a jpg and then ordered an 11x14 poster of that collage from Walmart's photo center.
 
The quality turned out great and the best part is:
poster print shipped to my office                                                      $2.93
11x14 frame (found on a local Buy Sell Trade Facebook group)      $2.00
Total Cost of this Project:                                                              $4.93
 
 
 A special thanks to Target, Toys to Treasure, Imax/Bill Warren, my Mom, The Twilight Marathon, Junior Mints Peppermint Crunch, Burlap Christmas Garland, Christmas Hadley, The Bible, Diet Coke, my cousins Ashley and Bethany, Trivial Pursuit, my mom and grandma, Scrabble, Laura and Josh, Jingle the Husky Pup/Hallmark, Christmas, Laura playing carols, Jordan and Lance, Christmas Hadley, brushing Hadley, globe, presents, I ♥ You Because... Chalkboard, my Oscars party, Snowman named Richard Parker, Charisma hair salon, sweet Hadley, my dining room, and my Dad holding sleepy Hadley for being some of my favorite people, things and memories!!