I went to a garage sale and Hobby Lobby this morning. I got a cute little table for $2.00. I thought about trying a mosaic tile, but I decided on this:
Here is the table I started with:
And the materials I picked - scrapbook paper in a pale blue houndstooth (2 pieces @ .59¢ each) and rub on inspirational words and sayings ($2.59) (I LOVE decorating in words)!!
The rub on transfers were very easy, just cut them apart, arrange them, remove the paper backing and rub on with a popsicle stick.
Then I painted mod podge over everything.
I let it dry and put the table back together - I love the end result!
Search This Blog
Saturday, August 13, 2011
Thursday, May 5, 2011
Paper Flowers: Unique Gift Embellishments
This works with paper, cardstock, old pages of books, even felt. Start with a square and draw a spiral. Don't worry about being precise!
Cut the outside circle, then cut along the lines.
You'll end up with a spiral snake.
Start with the outer end of the spiral and wrap the spiral, tightly at the beginning.
When you get to the end (the circle at the center of the spiral) fold the circle underneath and glue the bottom of the flower to the circle.
Cut leaves and glue all together on a gift!
Monday, May 2, 2011
My Dining Room Makeover: Interior Design Tips & Tricks
Before, After and everything in between!!
Here are some design tips I put into practice in my dining room makeover:
1. Curtains
*Shimmery curtains give a feel of luxury to a room.
*The longer the curtains, the more formal the room.
*A substantial curtain rod adds a fantastic architectural element to the room.
*Hanging the curtains close to the ceiling gives the illusion of height.
*In an apartment, covering the vertical blinds with curtains makes such a big change in the room.
2. Mirror
Hanging a mirror in a small space makes the room appear larger. A great way to hang anything on the wall is to trace the outline on wrapping paper, mark where the nails should go, then tape the wrapping paper up. This lets you adjust the height without putting holes in the wall. Once you are happy with the position of the wall hanging, nail through the wrapping paper, then tear it down.
3. Black Accent
Adding small touches of black to any room creates a strong visual impact. It can add drama and elegance to any color scheme.
4. Color
I love a neutral palette with pops of color. Bright green accents give this room a clean, modern feel. It's also great that by changing the plates and centerpiece, I can have a totally different room!
5. Texture
Combining various textures also adds visual impact. My curtains have a crinkly and shimmery texture, the centerpiece and candle holders are smooth glass and vases and plants I added have a very organic, rough texture.
Happy Decorating! If you have any before and after pics - I'd love to see them!
Thursday, March 24, 2011
Lemon Sugar Hand Scrub
I love the softening and exfoliating effects of hand scrubs - so I decided to make my own - and loved it so much I gave it to my mom as a birthday gift!
Ingredients:
•2 1/2 cups white sugar
•1 cup EVOO (extra virgin olive oil)
•4 tablespoons lemon juice (I also added lemon zest)
I found there was too much EVOO in the finished product, so next time I would add less. Mix ingredients together.
Then pour into a cute glass container that seals.
Add a label - I decided I liked the edge made with pinking shears.
Use Mod Podge to attach the label and make sure to put a top coat on - to seal it.
Add a ribbon and a spoon or scoop and it's ready to give as a gift!
Monday, March 14, 2011
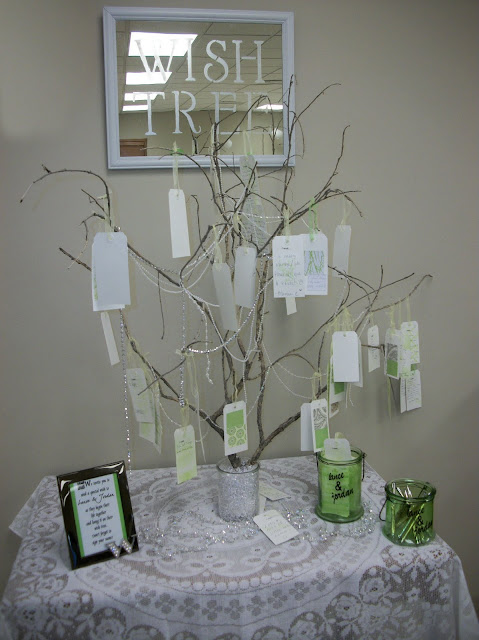
Wish Tree
I found this idea on the Internet while searching for ideas for my sister's wedding. I found that it's a Dutch wedding custom where guests are given a piece of paper to write their wishes to the bride and groom and then hang it on the tree. This creates lasting memories and a beautiful focal point. The Wish Tree can be used in place of or in addition to a guest book.
This Wish Tree looks like a simple vignette, but it took planning and many small projects to get this beautiful setting.
1. The "tree" is a branch I found on the highway. The diamond looking beads around the base were not strong enough to hold the branch, so I used plaster of paris in a small cup, then put that in the glass base, with the beads around it.
2. The jars on the table were found at Gordman's, the words cut out using a Cricut, then attached to the jars with mod podge. I used the jars to hold the tags and the pens.
3. Instructions were put in a frame. Some weddings use a poem as instructions, but we just invited guests to leave a wish for the couple.
4. The tags were "large blank tags" from Hobby Lobby. The fronts of the tags were stamped with a flowering branch stamp and had a clear label that said "I wish...". On the backs, I glued squares of scrapbook paper. Sheer ribbon in coordinating colors completed the tags.
Behind the tree, I used a mirror, with the words "wish tree" on it. To get the look of frosted glass lettering, I used a kit from Hobby Lobby and stencils.
Strands of iradescent garland around the tree and a lace tablecloth on a small wooden table finished the look. All the details together made a Wish Tree Martha Stewart would be proud of!
Monday, February 28, 2011
F-U-N Lettering
I love this project because it's so versatile, dramatic, easy and inexpensive! I first saw the idea at:
http://www.hgtv.com/handmade/easy-to-create-letter-display/index.html
I thought it would be such a whimsical addition to the candy buffet that I am planning for my sister Jordan's wedding!
I first bought the words "candy buffet" in chipboard letters from Hobby Lobby and chose scrapbook paper for each letter. Then I traced the letter onto the back of the scrapbook paper.
Then, I glued the paper onto the letter with Mod Podge:
I didn't choose to mod podge over the letters, because I didn't want a glossy look, but it would be a good protectant. Also, the nail file wasn't really necessary for me, to remove any extra paper on the edges.
The last step is to ink the edges to give it a finished and aged look:
Lettering could be used ANYWHERE! Home decoration, in the classroom, birthday parties, wedding and baby showers - the list could go on and on!
Monday, February 21, 2011
Engagement Setting
In just a few weeks, my youngest sister is getting married. She and her fiance asked me to take their engagement pictures and left any setting or props up to me - I was SO excited to plan a beautiful, colorful, elegant outdoor setting.
I chose a spot at the Anthony Lake that had arching branches as the backdrop.
We chose a bright fall color scheme.
I spent a weekend going to Pier 1, Hobby Lobby, World Market, Gordman's, Target and antique stores gathering ideas and buying a few items. I was excited to find the brightly colored folding chairs at Target for about $8.00.
I ended up getting most of the dishes from my mom's china cabinet - I love those depression era pink dishes!
I dipped strawberries in chocolate and drizzled white chocolate - it added beautiful color to the table, added a romantic element and was a favorite of the couple's!
Beautiful setting, beautiful couple, beautiful pictures!
I loved the setting so much, I used it as the background for my blog!
Subscribe to:
Posts (Atom)
Signature
You Might Also Like...
-
We wanted to create a giant polaroid as a version of a photo booth for my sister Laura's wedding. For this Project you'll need: ...
-
I love a good transformation! Here's all the steps in between: These chairs, I believe they're called motel chairs, belonged to ...
-
For my guestroom, I searched Pinterest for inspiration and knew I wanted a bed frame that looked like this: Or lik...