Search This Blog

Monday, October 31, 2016

Spooky Old Tree Art


I saw this pin on Pinterest and decided to make a spooky tree.


It was actually really fun to make!

I started by painting a sunset scene on a page with watercolors.


Then I used this ink and a q-tip to paint a spooky tree trunk.


Then I splattered drops onto the page.


Then I used a straw to blow the dots into spooky looking branches!


I love how it turned out and now I have the perfect spooooooky old tree (one of my niece's favorite books) to hang up for Halloween!


Have a Happy Halloween!!

Monday, October 24, 2016

Fabric Letters


I've wanted to make fabric letters for a long time. Then I found this version on Pinterest and I fell in love with it - I wanted my letters to look EXACTLY like these - I wanted the same frayed edges and adorable fabric (which I discovered is Toy Chest by Penny Rose Fabrics - to me it has the look of vintage children's books and that is so perfect for these letters).


 BUT the fabric is no longer available to buy. Luckily, I found exactly what I needed for sale on Etsy (shoutout MixFabrics) for a reasonable price and it came in adorable packaging!  win/win/win


Step one was to create the alphabet patterns and cut them out.  If you want to use the font I used here is the free template.

My fabric came already cut in 5 inch squares.  So the next step was to cut fabric backing and batting into just a little bigger than five inch squares.  Use your rotary mat and cutter and this goes pretty fast.

Then I laid out my fabric squares to make sure I liked the color order.


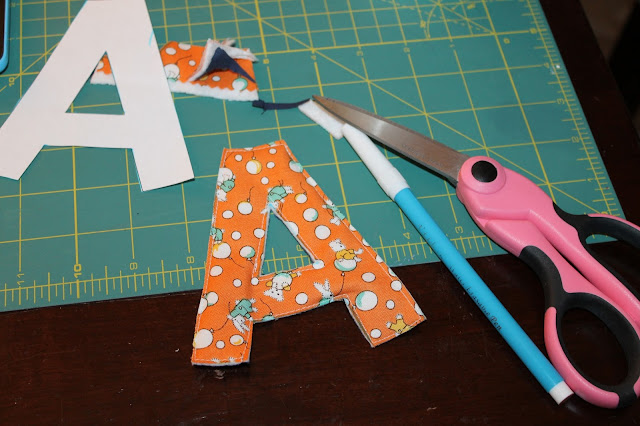
Then you make a fabric sandwich and put your letter template on top and trace around it with a fabric marker.


 Then you sew about a 1/4 inch inside your drawn lines, because the lines will be your cut line.


I had a lot of fun playing with the letters - hopefully my littles will too!


Then I took a leap of faith and washed and dried the letters in the washing machine/dryer.

They came out like this - which was scary!


But after a lot of thread clipping and ironing - I think they turned out very:


Monday, October 17, 2016

Rope Bowl - "Make it Work Moment"


I saw this DIY rope bowl on Pinterest and I really wanted to make one - I thought it would be perfect to use when trick-or-treaters came by my office. I planned to use orange, yellow and white thread to make it look candy corn inspired.


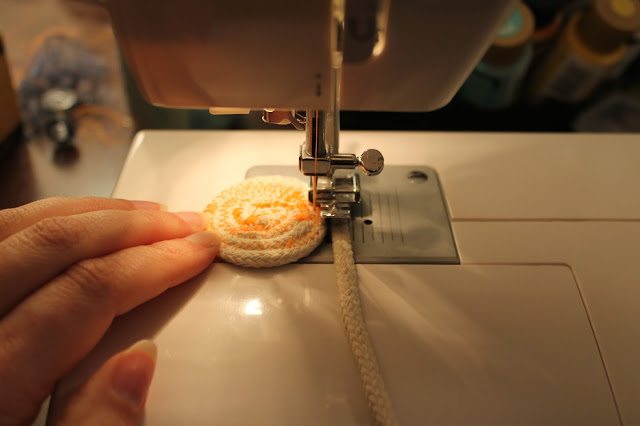
At first it went fine, but then after you make a flat coil, you're supposed to hold the coil up and then sew more layers around - making the edges of the bowl.

I made two different attempts and ended up very frustrated and it just did not work. This doily-looking thing is what I ended up with.

 
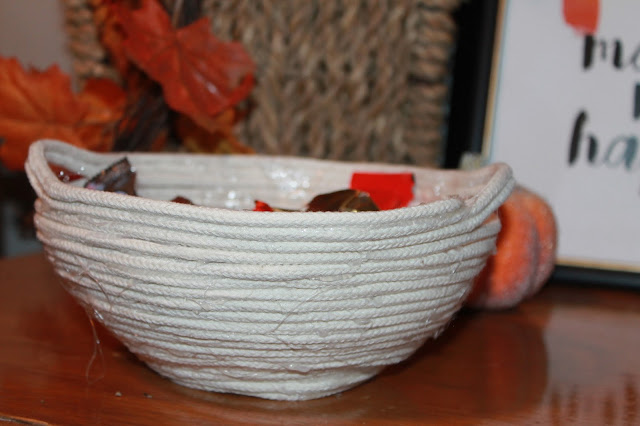
So I tried a different approach.  I had a "make it work moment" (for anyone who doesn't watch Project Runway, that's become Tim Gunn's catchphrase).  I had read that you could do a no-sew version, by hot gluing the rope, so I tried that.  I used a glass bowl as a form and covered it with saran wrap to protect the bowl.  I think parchment paper would have been a better idea, because the glue got on the saran wrap and it became an integral part of the interior of the bowl.


I left a space on both sides and did two more rounds of rope and that created handles.


So - I got my bowl even if it wasn't exactly what I had envisioned.  On to the next project!


Monday, October 10, 2016

Ideas

I have some ideas in "pre-production" and I have some ideas at the back of my mind and I'm still in the brainstorming phase with some ideas.  But I don't have any finished, well-photographed projects to share today!  So I thought I would share my ideas.

1. Fabric letters - I have fabric ordered - this one is definitely happening!


2. Felt trees - I have the materials but I don't have the drill I need - this one is on hold for now.

3. This is a pin I keep thinking about - I'll try it sometime in the future.


4. Mmm- fried mac and cheese is my favorite food! I keep thinking I'll make this sometime, but it hasn't happened yet.


5. I'm also trying to figure out a creative way to display some of the Christmas printables that I designed (and are for sale on my Etsy shop). This one I'm still brainstorming.


Come back next week to see what I have accomplished!


Monday, October 3, 2016

DIY Felt Paper Clip Bookmarks

Starbucks coffee cup from felt, DIY bookmark, gold paperclip
 
I've been using my prayer journal that I created here recently but it's been driving me crazy to have to flip through the pages to find the next day, so I knew I wanted to create a bookmark - and not the traditional kind, since it's a small 3 ring notebook, because it wouldn't stay put. So I settled on a paperclip bookmark. Since my journal has gold dots on it's cover - I wanted a jumbo gold paperclip and I also needed felt (luckily I had a bunch left from when I did Hadley's Quiet Book

I made several and decided the method I like best is to cut a front and back for the main piece and sew the design to the front piece (sequins or other felt pieces) and then sew the plain back piece to the paperclip.

 
 I made this one because my most recent nickname from my family is Kitten Paws and any time we're talking on Facebook, when my nickname comes up, I use this Pusheen paw as my signature!
 
Cute coffee cup, evocative of Starbucks!


Signature

Signature

You Might Also Like...

Blog Archive