Search This Blog

Monday, October 10, 2022

Painting Pumpkins for your Halloween Porch

I saw this picture this year and felt so inspired by it!  I really considered getting faux pumpkins and painting them and then figuring out how to create this installation.  There are approximately 31 pumpkins on that porch... even if I only did one vertical installation - it would have been at minimum 6 pumpkins.  And for reasons I can't fathom - faux pumpkins are EXPENSIVE - at Michaels a 13" Orange Craft Pumpkin by Ashland is $29.99 - same size at Walmart $14.98.  So I settled on buying a few real pumpkins and painting them.  I really had fun with it!  


1. I never knew these smaller sized pumpkins are called pumpkin pie pumpkins.  Adorable.

2. I kept our color palette limited to black, white, dark pink, light pink, orange and tan.  Like the inspiration picture.

 
 3. I found the paint dries pretty quickly and that two coats looks great.

4. I found the perfect disposable paint trays - at Dollar Tree!  They're Styrofoam rectangles and really perfect for painting projects with kids!

5. While at Dollar Tree - I also got plastic cups that are now designated as paint water cups.

6. And I believe you can get foam paint brushes there.  DT FTW!


They look SO cute on the porch!!
A special thanks to my mom Debbie and my niece Gia for painting pumpkins with me!


Monday, October 3, 2022

Pumpkin Sewing Craft


I love crafts that are cute and that use things I have around the house.  This is both!  Gia - my niece who is in kindergarten - made this craft!  

For this project you'll need:

  • the plastic lid from sour cream or something similar
  • orange yarn
  • a green pipe cleaner
  • a plastic sewing needle
  • a hole punch
  • a small stick from outside


I prepared this craft before she arrived.  I cut the center of the plastic lid out, then from the inside, I punched holes all the way around.

I also threaded the yarn through the needle for her.  

I found that I had trouble explaining the concept of bring the needle up from the bottom and back down through the top.  She kept flipping the lid and not understanding which was the top/bottom - so luckily I realized it was a time to say - you can sew this however you want!  It turned out great!  

To curl the pipe cleaner, just wrap it around a pencil.  Then I used the pipe cleaner to secure the stick.

Monday, September 26, 2022

Create the Perfect Treasure Chest

I think every little boy goes through a pirate and treasure phase!  This is a super simple way to join in the fun and create a happy memory! 

Step 1:  Create a treasure map - for tips check out this blog post

Step 2:  Create a treasure chest!  You can find one of these at most any craft store or you can get on Amazon:


Step 3:  Paint the box.  They key to making it look old is different shades of paint.  Paint it brown.  Then while it's still wet, add gray on top.  Then add some black streaks.  Then add brown streaks.  

Step 4:  Fill the box!  Not so much anymore, but Michaels used to have a colorful rock station for kids.  If you don't find them in a store, you can find similar ones here.  Other super fun fillers are pyrite and chocolate gold coins!


Step 5: Have one adult stay with the kids and one adult go to the location to hide the treasure and the map!  (Inside a bottle is always fun.)

Step 6:  Once you're all at the location - make sure the kids find the map - then tell them a story about how you've always heard there was buried treasure around there.  Maybe this map leads to it!  


Monday, September 19, 2022

Quiet Book - Matching Game

I found some dump truck buttons on Etsy and thought they would make a perfect matching game for Kellan's Quiet Book.  Actually a pretty hard matching game - they're all the same shape, same wheels, but all have two different colors on them.  My next challenge was that there weren't enough different color combinations.  So I problem solved that #likeaboss and used markers to make some new color combos.  


I had to really think through this one.  For the game to be fun more than once, you have to be able to move the pieces around, so I cut out a lot of little squares.  I sewed Velcro to half the squares and hand sewed a truck button to half the squares and then sewed the Velco squares and the truck squares together.  Then I cut flap pieces, sewed those to the background pages, finally I sewed Velcro under the flaps.


My mom and I played it and it was very fun!


Thinking of making a Quiet Book - an assortment of felt will help get you started!

Monday, September 12, 2022

Quiet Book - Snail Lacing Page


For this project you'll need:
Felt: 9x9 blue, 9x9 purple (any shell color), scrap green, light pink (any body color) and white
pony beads
shoe lace
needle and thread
sewing machine
googly eyes (or you can make them out of black and white felt)


Steps:
1. Cut out felt pieces
2. Sew spiral shape onto shell (large circle piece of felt).  I used the triple stitch feature on my sewing machine so it would show up better
3. Hand sew the pony beads
4. Sew the felt pieces down
5. Sew the shoe lace to the bottom and cover it with another layer of grass.
6. Add googly eyes If you're making a Quiet Book - an assortment of felt is a great way to get started!


Monday, September 5, 2022

Learning Your Name Quiet Book Page

This is a pretty cool page!  To make the "paper" I used different colors of thread in my sewing machine.  On white felt, I sewed the top and bottom lines with a tight stitch and then the widest possible stitch for the middle.  Then I cut my nephew's name out of a double layer of felt, then I stitched them together, to give the letters a bit of weight.

The other side of the spread was a little pocket, with a snap closure to store the letters.


Monday, August 8, 2022

Bedroom Design Tips


1. Curtains make a huge visual impact.  The curtains behind my bed are covering up 1 window and a lot of wall.  From a practical standpoint - it's unnecessary!  From a design standpoint, it is everything.  It provides symmetry and a backdrop for the bed.  All my curtain rods were hung at the top of the wall, as close to the ceiling as I could get.  This adds height to your room and gives the room a sophisticated feel.  My curtains were from Kohl's, but the ones below from Amazon are similar.  


 2. When you're designing in a neutral color palette, texture is everything.  My curtains have a linen texture.  The lamps have a texture.  The upholstered headboard, pillow shams and throw pillow all have texture.  The throw blanket was chosen for it's texture.  In a corner you don't see, I added a coiled rope laundry hamper.  Even the artwork I designed was all about texture.  I made this using an inexpensive canvas and joint compound.  The other thing is - don't be nervous if everything is not the same shade.  In this room, I have the range from greige to white to ivory to linen and I was nervous that the different shades would be disharmonious, but in reality, it all works together.  Tone on tone neutrals.

Similar art at Amazon: https://amzn.to/3Or142j
  

 3. Scale.  There were lamps that I really loved, I ordered them (from Walmart, surprisingly) and I really wanted them to work, but they were diminutive on my night stands.  The pic on the left uses "See it in your space" technology from Target, but that's about how the lamps looked.  


My lamps are from Target, but these from Amazon are similar and a great deal!  


 4. Storage.  To the extent you can, "Marie Kondo" your items.  Then figure out what furniture or system you need to keep your room picked up all the time and work that into your design plan.  The storage cube system I got from Target contains:  gifts that I've bought, books/journals, a neck massager, cards/paperwork/candy, items to get rid of, and upcoming projects.  Before realizing I needed storage for these categories, they were in piles around my room.  Even if it doesn't stay perfect, it's important to have a place that everything is supposed to go.

5. Layers.  This is where things get expensive, but it's also what makes a room feel luxurious.  And it doesn't have to happen all at once.  My main window has a double curtain rod, with sheers behind the curtains.  All of that adds another texture and another layer.  Practically, they allow light it while giving some privacy.  On the bed, I have my regular pillows, 2 euro pillows and a lumbar pillow.  I have a super textured throw blanket for the end of the bed.  And I just bought a "summer throw blanket".  I haven't bought a rug yet, but that adds another layer to the room.  Also I've thought about getting some type of basket to put under my nightstands.
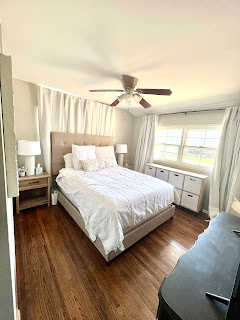


 6. Lighting.  Two lamps on either side of the bed is classic.  If you need the surface of your nightstand and feel like a lamp would take up too much room, wall sconces or mounted lights are good.  I found technology to help me with lighting and it has made me so happy!  I bought a "smart plug" that my two lamps are plugged into and I can control them via an app of my phone.

They are scheduled to come on in the evening and then I use the app to turn them off when I go to sleep.  

7. Accessories.  I don't find it necessary to overly accessorize a bedroom.  It is important to have a natural element - a plant (live or faux) or flowers (live only).  Beyond that try to add necessaries that serve a purpose.  If you take rings off right before bed, add a cute dish on your nightstand.  If you like candlelight, add a candle. 

Signature

Signature

You Might Also Like...

Blog Archive