Search This Blog

Thursday, March 24, 2011

Lemon Sugar Hand Scrub

I love the softening and exfoliating effects of hand scrubs - so I decided to make my own - and loved it so much I gave it to my mom as a birthday gift!


Ingredients:

•2 1/2 cups white sugar
•1 cup EVOO (extra virgin olive oil)
•4 tablespoons lemon juice (I also added lemon zest)


I found there was too much EVOO in the finished product, so next time I would add less. Mix ingredients together.


Then pour into a cute glass container that seals.


Add a label - I decided I liked the edge made with pinking shears.


Use Mod Podge to attach the label and make sure to put a top coat on - to seal it.


Add a ribbon and a spoon or scoop and it's ready to give as a gift!

Monday, March 14, 2011

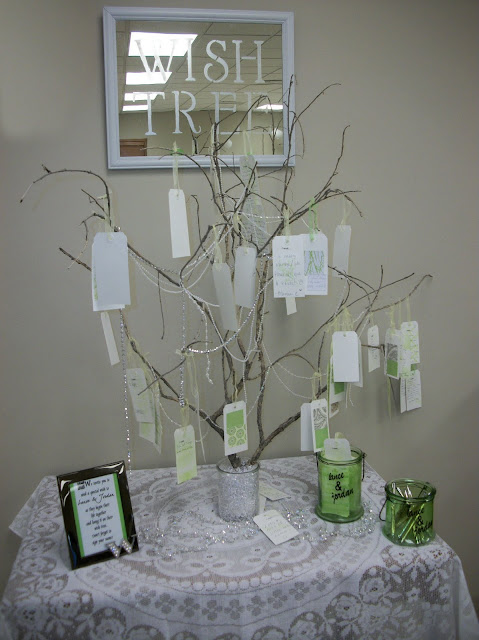
Wish Tree

how to make a wish tree

I found this idea on the Internet while searching for ideas for my sister's wedding. I found that it's a Dutch wedding custom where guests are given a piece of paper to write their wishes to the bride and groom and then hang it on the tree. This creates lasting memories and a beautiful focal point. The Wish Tree can be used in place of or in addition to a guest book.

This Wish Tree looks like a simple vignette, but it took planning and many small projects to get this beautiful setting.

1. The "tree" is a branch I found on the highway. The diamond looking beads around the base were not strong enough to hold the branch, so I used plaster of paris in a small cup, then put that in the glass base, with the beads around it.

2. The jars on the table were found at Gordman's, the words cut out using a Cricut, then attached to the jars with mod podge. I used the jars to hold the tags and the pens.


3. Instructions were put in a frame. Some weddings use a poem as instructions, but we just invited guests to leave a wish for the couple.


4. The tags were "large blank tags" from Hobby Lobby. The fronts of the tags were stamped with a flowering branch stamp and had a clear label that said "I wish...". On the backs, I glued squares of scrapbook paper. Sheer ribbon in coordinating colors completed the tags.


Behind the tree, I used a mirror, with the words "wish tree" on it. To get the look of frosted glass lettering, I used a kit from Hobby Lobby and stencils.


Strands of iradescent garland around the tree and a lace tablecloth on a small wooden table finished the look. All the details together made a Wish Tree Martha Stewart would be proud of!

Monday, February 28, 2011

F-U-N Lettering

I love this project because it's so versatile, dramatic, easy and inexpensive! I first saw the idea at:
http://www.hgtv.com/handmade/easy-to-create-letter-display/index.html

I thought it would be such a whimsical addition to the candy buffet that I am planning for my sister Jordan's wedding!

I first bought the words "candy buffet" in chipboard letters from Hobby Lobby and chose scrapbook paper for each letter. Then I traced the letter onto the back of the scrapbook paper.


Then, I glued the paper onto the letter with Mod Podge:


I didn't choose to mod podge over the letters, because I didn't want a glossy look, but it would be a good protectant. Also, the nail file wasn't really necessary for me, to remove any extra paper on the edges.


The last step is to ink the edges to give it a finished and aged look:


Lettering could be used ANYWHERE! Home decoration, in the classroom, birthday parties, wedding and baby showers - the list could go on and on!

Monday, February 21, 2011

Engagement Setting

In just a few weeks, my youngest sister is getting married. She and her fiance asked me to take their engagement pictures and left any setting or props up to me - I was SO excited to plan a beautiful, colorful, elegant outdoor setting.

I chose a spot at the Anthony Lake that had arching branches as the backdrop.


We chose a bright fall color scheme.


I spent a weekend going to Pier 1, Hobby Lobby, World Market, Gordman's, Target and antique stores gathering ideas and buying a few items. I was excited to find the brightly colored folding chairs at Target for about $8.00.


I ended up getting most of the dishes from my mom's china cabinet - I love those depression era pink dishes!


I dipped strawberries in chocolate and drizzled white chocolate - it added beautiful color to the table, added a romantic element and was a favorite of the couple's!


Beautiful setting, beautiful couple, beautiful pictures!


I loved the setting so much, I used it as the background for my blog!

Saturday, February 12, 2011

Projects From the Past Year

Most recent - I wanted a place to hang my keys, right when I walked in the door. I layered three pieces of cardstock as a background and then put up a 2 prong hook from Hobby Lobby.


My Home Office

BEFORE

AFTER


Floating Shelf - Clear tumblers filled with colorful office supplies became a great place for storage and create a colorful focal point.


Christmas Trees - I decorated my small tree with LOTS of lights, a colorful snowflake garland, and glittery champagne colored ornaments.

My tree (a hand-me-down from my parents) didn't have a tree stand, so I used a flower pot, still filled with dirt and ivy as the base, I also put a copper colored charger under the tree.

Diet Coke Necklace - I LOVE diet Coke - I used a small heart punch to cut the area of the empty soda can that I wanted.

Glass Block Lamp - I saw one of these lamps at RiverFest and wanted to try making one - I don't love how this one turned out, but it was an experiment.

Experiment with making my own bubble bath - the formula for the bubble bath didn't turn out great (not enough bubbles) but I LOVE the packaging I came up with! I love the personalized label!


Spring Flower Arrangement in my Living Room

Patio


Signature

Signature

You Might Also Like...

Blog Archive