Search This Blog

Monday, June 6, 2016

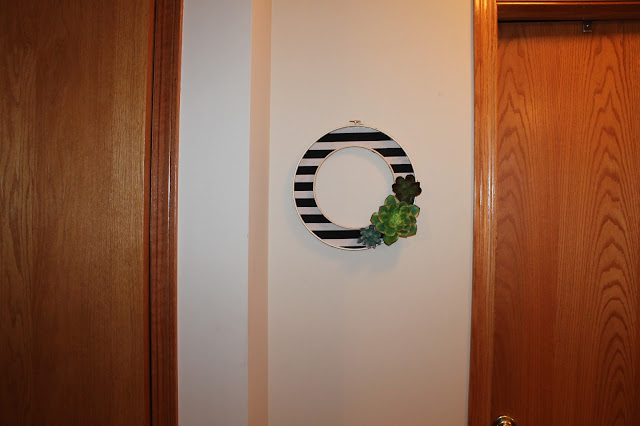
Modern Striped Succulent Wreath


Modern Striped Succulent Wreath, modern wreath, DIY wreath


Pretty Providence Wreath

While searching for a unique wreath to make on Pinterest - I found  this one and was obsessed with it - I used the Pretty Providence blog instructions to make my own and made my own adjustments in some places.

I got my materials from Hobby Lobby and bought two embroidery hoops, black and white striped fabric (I am using this as an outdoor wreath, so I really wanted to find laminated fabric.  Hobby Lobby had some, but I determined the stripes were too wide), a roll of cork and succulents.  The hoops I used were 4 inches apart and I think that looks about right.


This was way more difficult to make than I expected.  One problem - the cork is pretty thin and tears easily.  Another - the blog says to cut out the circle from cork and fabric and then hot glue the embroidery hoops on.  I tried this and even though I traced around the outside of the hoop, the cork ended up too small.  So I mod podged fabric first then hot glued the hoops on, then cut off the excess, which was really challenging.


With the hardened hot glue right at the edge, it was really difficult to cut the excess off.


Monday, May 30, 2016

Playhouse Planning

As soon as my sister and brother-in-law moved into a house with a playhouse, the wheels in my head started turning.  I'm pretty sure my four year old self would have loved a playhouse in the backyard and I was pretty sure my four year old niece would love it too!  For her birthday in January, I told everyone my gift was to fix up the playhouse and I've been planning ever since.  #ILovePlanning

I started searching for inspiration pics - here are a few:


2


3


4


5


6


And I started making lists.


And at her party (in January, at night) I went outside and took pictures and measurements.


And I drew schematics.


Here are the categories I started thinking about:

Paint
Flooring
Furniture
Lighting
Exterior
Decor/Styling

That list seems pretty small, right?  I'll write a short paragraph about each category so you'll see my thought process.

Paint

I decided right away that the walls and ceiling should be all white because it's a small enclosed space and bright white will make it seem larger and brighter.  I researched whether I should choose interior or exterior paint.  I learned interior is used in a climate controlled environment, so I bought a paint that had exterior properties.

Flooring

I didn't know what options were out there, so I researched painting/staining concrete and laminate flooring.  Then I stumbled on to foam tiles that look like a wood surface and just lay on top of concrete.


Here's a customer picture that used this tile:

I'm pretty excited to see how it turns out in the playhouse!

Furniture

Back in March my mom and I took a  trip to IKEA and I had a list of playhouse furniture to get!  I got a kitchen, table and chairs and bench with storage tubs underneath.  At Target I found a bean bag chair and at Hobby Lobby I got a little metal drum table.

Lighting

I considered a string of battery operated lights or a grouping of lanterns, but I ended up with one pink sparkly paper lantern, with a remote, which should be pretty fun!

Exterior

Blogs and Pinterest reminded me to think about the exterior of the house as well as the interior.  To add "curb appeal" I bought a mailbox (mailboxes for kids were crazy expensive, so I used a grown up one from Menards); solar powered sconces (also surprisingly hard to find for a reasonable price); a windowbox (Menards); two pots with small boxwood bushes in them and a stone paver as a porch.

Decor/Styling

Styling a room is seriously one of my favorite things, so I may have went a little bit crazy, but how many times in your life do you get to decorate a playhouse?

curtains
shelves
wall art
chalkboard
dishes
stuffed animals
books
rug
pillow
bunting
garland

all fall into this category -

follow my blog to see all the pictures in the next few weeks.

Monday, May 23, 2016

Super Sweet Mini Bunting

Hadley's Playhouse

My big project the last 6 months has been preparing to fix up a playhouse for my niece Hadley.  The time is finally here - I leave this week to go do the project (stay tuned for the #BigPlayhouseReveal in the next few weeks) so at the last minute I decided I wanted to make a mini bunting.  I'm not even sure where I'll put it, but bunting always makes a space happy!

I went to JoAnn's Fabric to look for fabric.  I didn't know exactly what I wanted.  I thought about a shades of pink look or a rainbow look, but I saw this fabric and fell in love with it. 


For this project you'll need:

Fabric in coordinating colors
double fold bias tape
paper/printer
piece of cardboard
pins
scissors
rotary cutter/mat
sewing machine


I used Microsoft Word to create a pattern.  My triangle was 5x5.  I printed it, cut it out and then made a pattern out of cardboard. 


I then used my rotary cutter to cut the triangles out of the fabric.  You'll need two triangles for each bunting flag.


Then I sewed the two long sides together.  The top will get sewed when you add the bias tape.  Then laid out the flags in the order I wanted.


And then pinned them inside the bias tape.


 Then I sewed on the bias tape, using a zig zag stitch.


 I love how it turned out - super sweet!!


how to make bunting, little girls room decor


Monday, May 16, 2016

Bedroom Dresser Styled

design, pink bedroom decor, gold accents

As I wrote in a previous post, I've been spring cleaning my bedroom and once I cleared the layer of papers, jewelry, hair clips, money, lotion, socks, etc. off my dresser, I realized it was in serious need of a style makeover.

When I moved in, styling my dresser was on my list of things to do, but then as junk piled up, it became less of a priority.  Now that the clutter is better organized - it was time to try again.

Here it is at its worst:


Here it is clean, but not very well styled - kind of a start, but in need of help.


Here are the things I did to give my dresser and really the whole room, an updated look.

1. Changed out the hardware on the dresser.  I've loved the current hardware - I picked it out when I did the initial Dresser Transformation but warmer metals are now "in"!  And pink and gold go together really well.


2. Added a rug in front of the dresser.  I found this runner rug on Overstock.com for a great price and I love it!  It feels so plush and I love the color and depth it adds to the room.


3. Stack of books - my local library was having a used book sale and it was the perfect chance to find oversized books for a great price with particular spine colors.


4. Plant(s)
Both plants are from Walmart - a cactus and a Sansevieria trifasciata (Snake Plant).  I researched plants and ended up with these because they're both low maintenance.  I picked the snake plant because it will tolerate low light.


5.  Lamp - from Target.


6. tray - Target dollar spot!


I knew these were some of the basic elements, but I had to play around with it a bit.


This Pin got me curious about that calendar object.  It's a vintage brass perpetual flip calendar - it is a  perfect addition to a dresser top.  The numbers are very graphic, it's practical and it has a vintage patina.  I discovered there aren't that many out there.  There were a few that were perfect, but I decided to go with one in my price range.  I think it's really fun to flip the gold part and then a new number appears.  #magic


I needed one or two more things for my tray and found this gold lantern in the Target outdoor section - just a reminder to think outside the box!


(It needed a little more height so I added clear coasters.)


A new throw from World Market completed the look!


Let me know what you think of the new style!

Signature

Signature

You Might Also Like...

Blog Archive