Search This Blog

Showing posts with label Goodwill find. Show all posts

Monday, February 19, 2018

Upcycled Bunny Face


This weekend, I was shopping at Goodwill and they had a bunch of Easter decorations out and when I saw this, I knew it would be the perfect thing to upcycle and hang in my entryway!


I taped the wire and spray painted it, but it didn't fully cover the paint underneath, so I painted with white acrylic paint and that worked great.  I sanded the edges for a rustic feel.

I painted the tiny wooden heart pink and cut up the floral stems and played with what I liked together.

Then I hot glued everything on and I LOVED how it turned out!


Monday, September 12, 2016

Painting with Milk Paint


I found these two things at Goodwill last weekend - I took a picture of them together because the bracelet was the color inspiration for the box.


Here are two other "before" pictures.

Step 1 was to remove the handle.

I went to Hobby Lobby and I thought that I would get chalk paint, but right next to the chalk paint was milk paint - which I had never used and really knew nothing about.  I googled it right there in the aisle and decided I'd give it a try.  I learned it would paint flat and a little bit lighter and then you also buy milk paint oil and that will finish, smooth and darken the paint and give it a smooth luster finish.

Here are the paints I bought and if you want to try them, you can buy them here:


I did two coats of paint.  Here is the box painted with the milk paint. The darker patch in the bottom is the beginning of the finishing oil.

Here is how it looks when adding the oil - which you rub on with a soft cloth.

I really love the color and how it turned out - it is exactly what I envisioned!  I added plaid paper in the top and I'm crazy about how Christmas-y that makes it!!!  The cute gift tags in the picture below were handmade by my mom!


Next week - I'll blog about how I added the graphic to the top of the box!


Monday, August 15, 2016

Yarn Wrapped Burgundy Fall Wreath with Handcrafted Burlap and Lace Flowers

burlap and lace flowers, DIY flowers

I bought some burgundy yarn at Goodwill a few weeks ago with a vague idea of making a fall wreath. This weekend, the idea fully formed in my brain and I decided to get an assortment of lace and burlap and see what I could come up with.  It was really fun to just play around with the materials and see what I could create!

Here are the materials I started out with:


Then as I was watching a Veep marathon, I wrapped the yarn around the wreath form.  Other times I've done this, I just wrapped layers of yarn around, but this time I made sure to do a single layer, which took more time, but I like how smooth it looks.  This shows my progress in motion!


Then, using various methods as detailed in some of my previous blogs (Shabby Chic Fabric Rosette Toddler HeadbandFelt Flower WreathEasy Toddler Dress) I made flowers out of burlap and lace (and cheesecloth and tulle that I had in my craft supplies).


I love how it turned out!


Monday, August 8, 2016

Upcycled Frame


I had bought this welcome sign at the Target Dollar Spot because I liked it's cheery colors.  My vague idea was to put it in a frame to elevate it from a bulletin board punch out sign to a cute piece of wall art.  But I discovered it was an odd size and I'd have to special order a frame.  So when out shopping at Goodwill, I found this frame that I thought my Welcome sign would fit in.  As you can see - it's definitely an outdated frame.  But it was unopened and wood and I knew it had potential!


I painted the frame with chalk paint.  Only 1 coat was needed.  I also painted the cardboard backing gray.  


Here are the other things that I think help elevate it - since it was a punch out piece of cardboard, there were perforations around the edge, so I got out a nail file and filed all the edges to make them smoother.  Also, I cut out squares of foam and used double sided mounting squares to attach the sign to the gray backing.  This gives it more dimension.  This project cost around $6 and I think it'll look great in my craft room!


Monday, February 8, 2016

Colorful Fabric US Map Framed in Embroidery Hoop

US Map in Embroidery Hoop

This idea is everywhere - but this picture is the one that stayed with me.  It's crazy adorable.


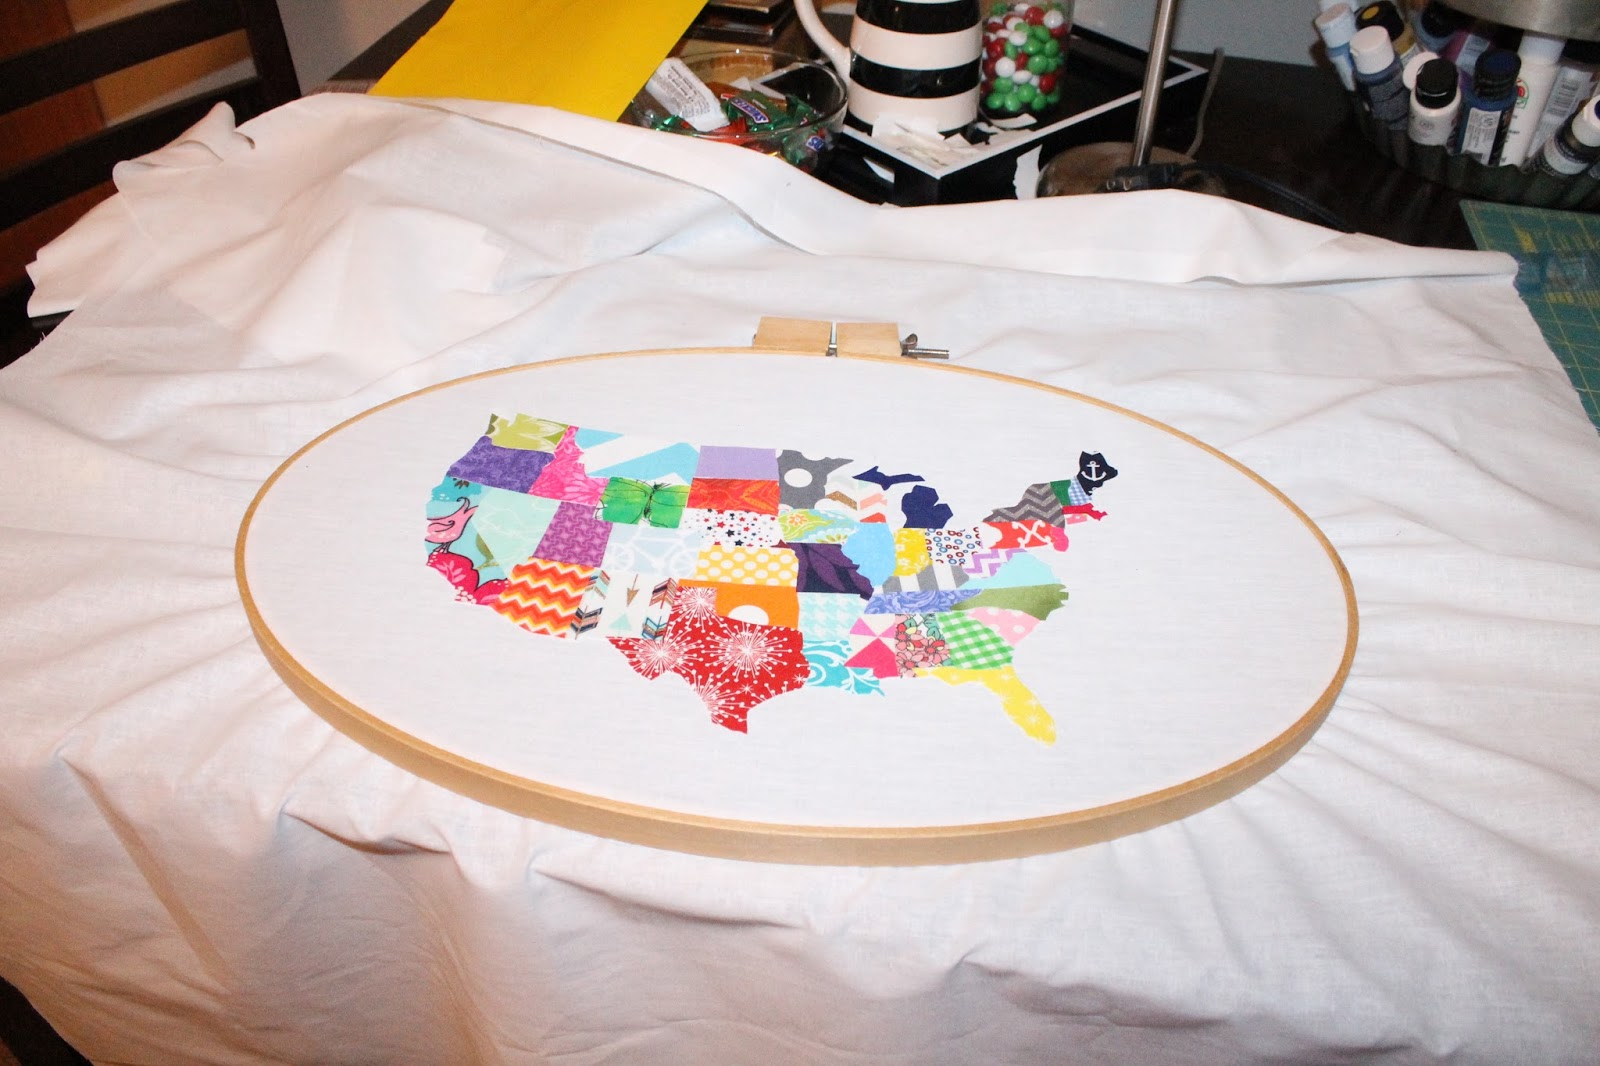
So then when I found a large oval embroidery hoop at Goodwill - I bought it.  Then it sat around for about a year.  It seemed like a really big project and I wasn't sure where to start.  Also, I have always had a mental block about fusible interfacing.

Finally, I decided to tackle the project.  I found this tutorial at See Kate Sew, which included a printable map pattern, so that is where I started.

I have a lot of scrap fabric, but I ended up buying quite a bit more.  I kept updating my family on the project using the hashtag #theresalotofstates And I wanted a variety of colors and I wanted the fabrics to have a connection with the states...in some cases.

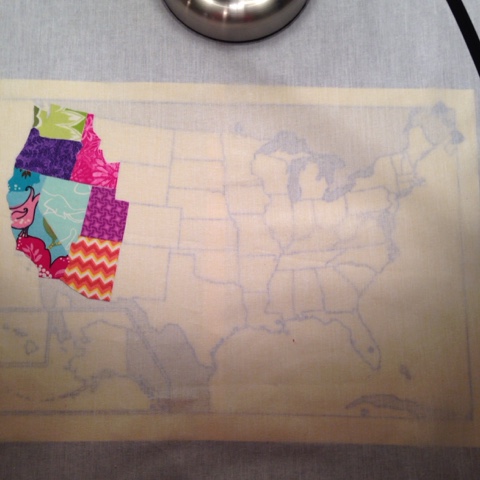
I printed two maps.  I cut out the states of one and laid them where they go on top of the other.

Then I picked fabric and ironed heat n bond to the wrong side of it.  Then I cut around the state pattern.  Then I laid the fabric state on top of the map.


I love this fabric that I used for New Mexico!


After all the states were done, I ironed a piece of muslin and layered the map pattern under the muslin.  That allowed me to place the states in the right place.


Then I peeled off the interfacing and ironed the states into place, starting with the west coast.


US fabric map framed in embroidery hoop


Signature

Signature

You Might Also Like...

Blog Archive