Search This Blog

Showing posts with label DIY wall art. Show all posts

Monday, November 18, 2019

Potato Stamped Art


Last January, to start the new year off creatively, Spoonflower created a #7DaysofDesign challenge to help creators explore new mediums.  Day seven was block printing.  Since I didn't have block printing supplies, I decided to use a potatoes.  I loved creating this art and I loved the result.
I carved a line and triangle into potato halves.


Then I tried dipping them in ink and in paint.  I think I ended up liking the paint better.


I loved the texture and imperfections, I loved how graphic the black and white looked - I loved everything about it!


I was also excited when I saw something similar in Hobby Lobby and online at All Modern.
It look a while, but I finally put them in frames and hung them in my home.  
I love decorating with art that is personal.


Monday, February 8, 2016

Colorful Fabric US Map Framed in Embroidery Hoop

US Map in Embroidery Hoop

This idea is everywhere - but this picture is the one that stayed with me.  It's crazy adorable.


So then when I found a large oval embroidery hoop at Goodwill - I bought it.  Then it sat around for about a year.  It seemed like a really big project and I wasn't sure where to start.  Also, I have always had a mental block about fusible interfacing.

Finally, I decided to tackle the project.  I found this tutorial at See Kate Sew, which included a printable map pattern, so that is where I started.

I have a lot of scrap fabric, but I ended up buying quite a bit more.  I kept updating my family on the project using the hashtag #theresalotofstates And I wanted a variety of colors and I wanted the fabrics to have a connection with the states...in some cases.

I printed two maps.  I cut out the states of one and laid them where they go on top of the other.

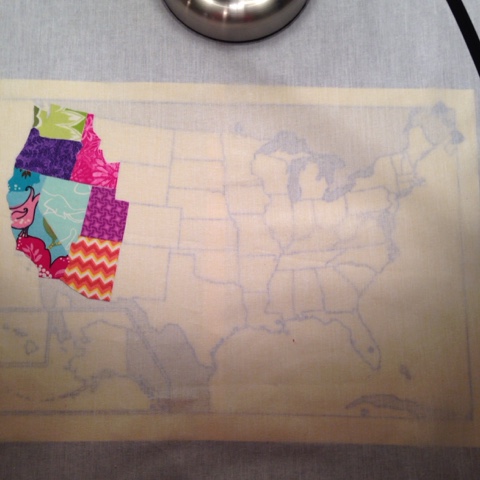
Then I picked fabric and ironed heat n bond to the wrong side of it.  Then I cut around the state pattern.  Then I laid the fabric state on top of the map.


I love this fabric that I used for New Mexico!


After all the states were done, I ironed a piece of muslin and layered the map pattern under the muslin.  That allowed me to place the states in the right place.


Then I peeled off the interfacing and ironed the states into place, starting with the west coast.


US fabric map framed in embroidery hoop


Monday, January 25, 2016

Office Gallery Wall


what to hang on my office walls, office decor
I've been gathering things for a gallery wall to put up in my office at work for...probably a year.  I've had this sketch sitting around for...quite awhile.


Then I got this amazing frame for Christmas (thank you Mom!!!).  It has 16 openings for 4x4 Instagram photos (I loooooooove to display Instagram pics) and that spurred me to action.
I laid everything out and edited and rearranged.  In fact, I wasn't happy with some of the pieces, so I found an 8x10 wooden frame I had bought at Goodwill and painted it with a mix of navy and black chalk paint and then pulled out a pack of stickers I had and a piece of cardstock and made the piece at the bottom left in an hour.

This is the "before" pic of the blank wall in my office.

Here is a GREAT tip for hanging things on your wall (and it's extra easy when that wall is in an office) - make a photocopy of the back of the frame.  Then tape that copy up on the wall and you can rearrange without putting a bunch of holes in the wall and see exactly where the nails need to go.


From the top down:

1. You can see all about how I made the Embroidery Hoop Bunting Wall Art in this link.
2. As mentioned above, I received this for Christmas, which can be found here and had some of my favorite Instagram pictures printed by Walgreens - who make it super easy.
3. In this blog link, you can see the creative process for the Whatever (Philippians 4:8) Print and in this link to my Etsy shop you can buy your own downloadable Whatever print.
4. I bought the adorable arrow from a local Old Town shop, Lucinda's, at a sidewalk sale.  
5. I elevated the clipboard by adding gold leaf to the clip, which you can read more about here.
6. And as mentioned before, I threw the final piece together at the last minute.

Monday, September 21, 2015

Colorful Circle Wall Art

DIY wall art


The picture above was my inspiration. I knew I wanted to replicate it, so I did some experimenting.  My first thought was to design it on the computer and have it printed.  I decided against this for two reasons: I really wanted it 12x12 and the only printing options were expensive and would have to be shipped to me, making them time consuming and in my inspiration, there is more color variation and texture within each circle.  So I decided to look for a new method.


I thought maybe to get the look I wanted, I needed to use water.  I also thought it would be easiest to use a hole punch to make a stencil and then paint within the stencil.  


Experimenting with punching out the circles and painting them with watercolors.


Finally I settled on punching out circles and painting them with acrylic paint.  I did a lot of paint mixing to achieve different shades.  It was really fun and made me feel like an artist!!


This part of the project was less artist and more engineer.  There was a lot of measuring involved.  


Yea - all the measuring is done and I get to arrange all the colorful circles!


36 circles were needed - I made what felt like 100, but as I was placing I rejected some if they were too similar to other colors.  So I ended up going back to the painting step to make 8 more.


Yea - they're all made and in their places.  That one - second row, five from the left - I used my gold leaf pen to do that one.  


After the pic above, I used double sided glue dots to attach each dot in place.  Then I found a white square 12x12 frame at Michael's.

Here it is all put together:


And here it is in it's place on my niece Hadley's gallery wall!!!


I think it's such a fun, cheery room!!

Signature

Signature

You Might Also Like...

Blog Archive