Search This Blog

Monday, November 19, 2012

Burlap Christmas Garland

Super cute burlap garland on my mantle!
(Burlap is so in right now)
how to make burlap garland

What you'll Need:
1 yard of burlap
twine
scissors
yarn needle 
3 ornaments (optional)
 Step One:  Cut the burlap into four inch strips. 
Tip:  If you pull out a thread four inches from the edge, it gives you a cutting guide.
 Measure your length of twine, however long you want it to be.  Cut it and tie a knot in one end. Thread your twine into your yarn needle and make large stitches. 
You'll find you have to push the burlap down to the knot.
 For a special twist, I added a 3 star ornaments spaced intermittently.
 Final Product!  A similar garland sells for $50.00 on etsy,
but without the ornaments, you can make this project for under $5.00!

Thursday, August 30, 2012

Updated Wooden Bench

My sister's new apartment did not have much color.   She decided to use a wooden bench as a entryway bench and we decided to paint it turquoise to add a pop of color!

This is the bench before we started:
 You will need:
a wooden bench
a medium grade sanding paper
primer
paint
small furniture paint roller
foam brushes
tarp
rolling tray (although we used paper plates)

Begin by sanding.  Rule of thumb - sand until the previous finish looks dull - no shine left.  Make sure to do this outside or on the tarp, because the sanding produces a fine dust.

Then prime, 2 coats.  Let dry in between coats. 
 This is the fantastic turquoise color we picked!
 This is how it looks in the space - isn't that amazing!
 As a finishing detail, we also painted a chipboard "W" to hang on the wall in the same turquoise color.
We talked about making a cushion for this bench - stay tuned - it may be a future blog post!!

Friday, July 6, 2012

Colorful Wall Art

Easy and inexpensive way to make your own personalized wall art!
You'll Need:
any size of canvas
old magazines
scissors
a template of letters or a shape
mod podge
foam brush
small paint

Start by cutting out colorful pieces from magazines.  Arrange them to cover the entire canvas.


Glue each piece of paper to the canvas with mod podge (using your foam brush) and then cover over the top with a coat of mod podge.  Let dry. 
 Then you need to choose a template (the template will be colorful, everything around it will be 1 color of paint).  I chose a rooster, because my sister Jordan did her kitchen in roosters.  I printed this from the internet and blew it up to the size I wanted, then cut it out.

I placed the template on top of the colorful canvas and started painting (using white or ivory colored paint gives a great contrast) with my foam brush.  After painting the entire canvas, I peeled up the template and the colorful shape of the rooster was underneath!  One option you can choose to give it an aged or hen-scratched look you can sandpaper a few areas of the painted canvas.

Easy Vase Update

Do you have a plain glass vase that you would like to update?  This is an EASY and INEXPENSIVE way to give your vase a new look! 

You'll need:
a vase (or even an old mason jar)
twine
glue gun/glue sticks
colorful buttons
flowers

Take your glass vase and wrap twine around it.  Glue the end down with your hot glue gun.

Also using your hot glue gun, glue buttons of various sizes and colors to the twine.

The last step is to add flowers and enjoy your updated vase!

Easy DIY Headboard

I recently redecorated my bedroom in gray and white. I decided to use barn wood as the headboard, to bring in color and texture and to add an architectural element to a plain apartment. But I saw one problem with that plan - I didn't want to lean against rough barn wood. So I decided to make a headboard that would coordinate in color, but would be a fantastic textural contrast to the barn wood. I started with a foam core board and cut it to the size I wanted.
Then I needed several yards of batting.
I chose a shimmery gray fabric for the textural contrast. (This is actually an inexpensive curtain panel from Walmart)
Then I laid everything out on the floor, fabric face down, then the batting, then the foam core board.
Then I got out my staple gun and went to work stapling the edges.
The result of adding this easy DIY headboard is an expensive-looking, layered look!


Thursday, June 21, 2012

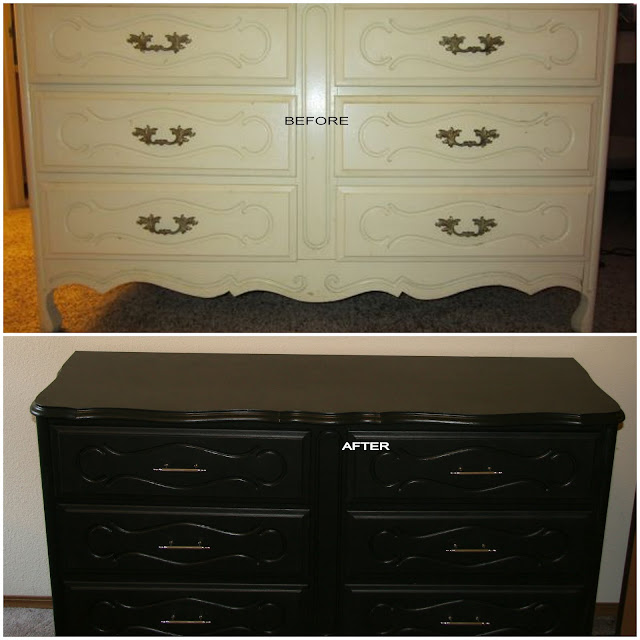
Dresser Transformation

DIY dresser, update an old dresser

I've wanted a dresser for awhile. I wanted one with an interesting shape. I found this on Craigslist.


My friend Gayle brought her truck and helped me pick it up (always a little scary) and I was ready to get started! I took out all the drawers and wiped everything down. I also took all the drawer handles off. There was a chunk missing out of the top, so I filled that in with wood filler, then sanded that down when it was dry.
 

One coat of tinted primer - I researched and chose to use this brand specifically, because the top of the dresser was a laminate and this type of primer will cover it well.


I did two coats of primer, using a small inexpensive roller on large areas and a little foam brush on the details. Then two coats of paint.
 

I chose "Black Magic" by Olympic in a satin finish from Lowe's - I love shopping at Lowe's - the workers are always so helpful! I used wrapping paper as drawer liners and added modern, chrome hardware. I also learned the tip that if the drawers squeak when you pull them out, you can rub a candle on the guide that the drawers slide on.


Let me know what you think!

Signature

Signature

You Might Also Like...

Blog Archive